

iSunshare iPhone Passcode Genius 4.1.1 For Windows Computer Trial Version
Powerful iPhone passcode unlocker to unlock iPhone quickly.
- Unlock the locked screen instantly if forget passcode
- Delete Apple ID from iPhone without password
- Remove screen time or restriction from iPhone safely
- Compatible with almost all iOS versions, including iOS 13


Features iSunshare iPhone Passcode Genius:
- Unlock the iPhone with a locked screen, no matter if it is an old, new, second-hand, or screen-broken iPhone.
- Remove the locked Apple ID from your iPhone, so that you can log in to a different Apple ID or create a new one.
- Remove restriction on screen time without data loss.
- Bypass the iPhone lock screen and Apple ID to regain full control of your devices.
- User-friendly, designed with an intuitive interface so that everyone can make use of it.
- Work smoothly on Windows computer to unlock iPhone.
How To Use?
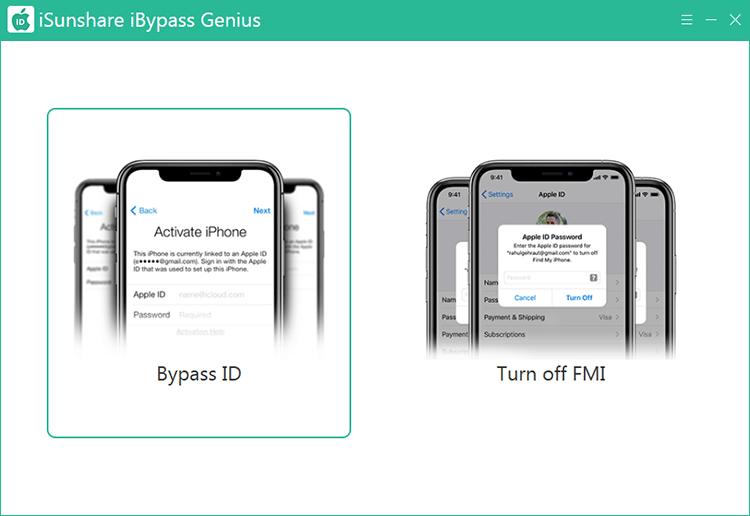
Part 1: Bypass iPhone/iPad/iPod touch Activation Lock
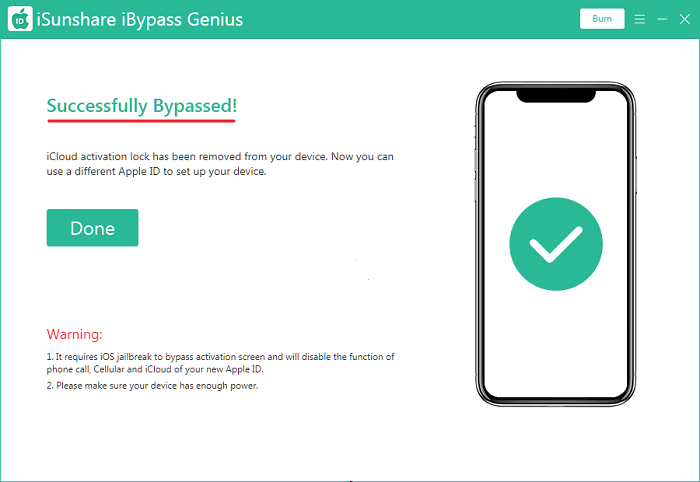
Note: After iCloud lock bypassing, you might be unable to use phone calls, Cellular, and iCloud of the new ID on your iOS device.
Step 1: Jailbreak your iPhone/iPad/iPod touch.
Insert a USB drive into your Windows computer and launch iBypass Genius.
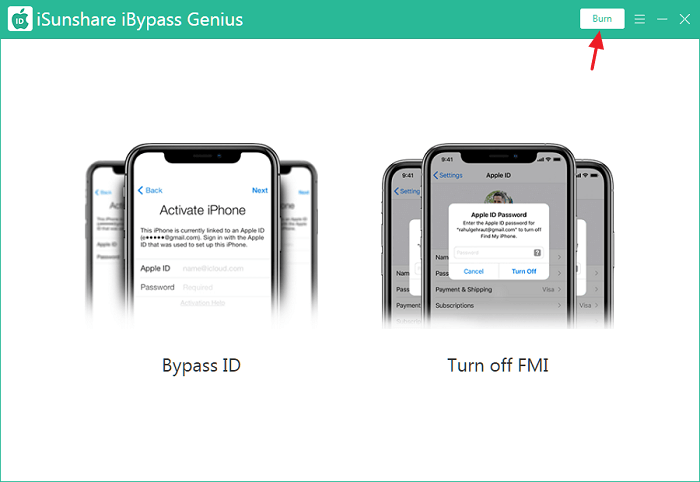
Click Burn in the top right corner of the interface.
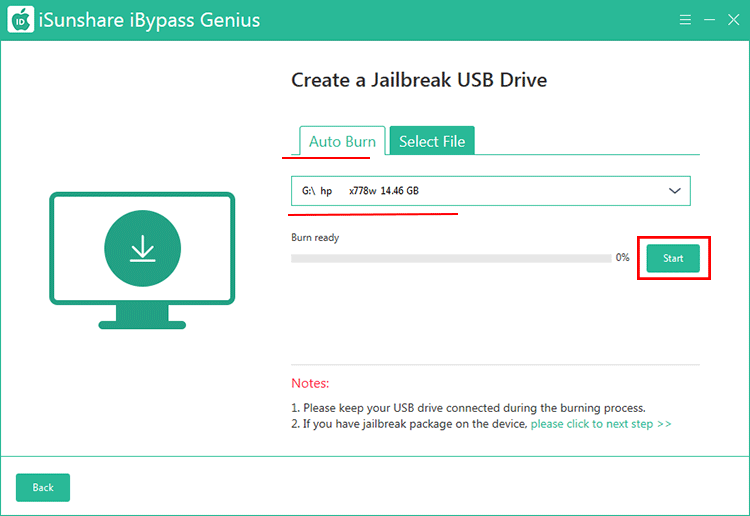
In the Auto Burn section, choose the inserted USB drive and click Start to download the firmware file and create a jailbreak drive.
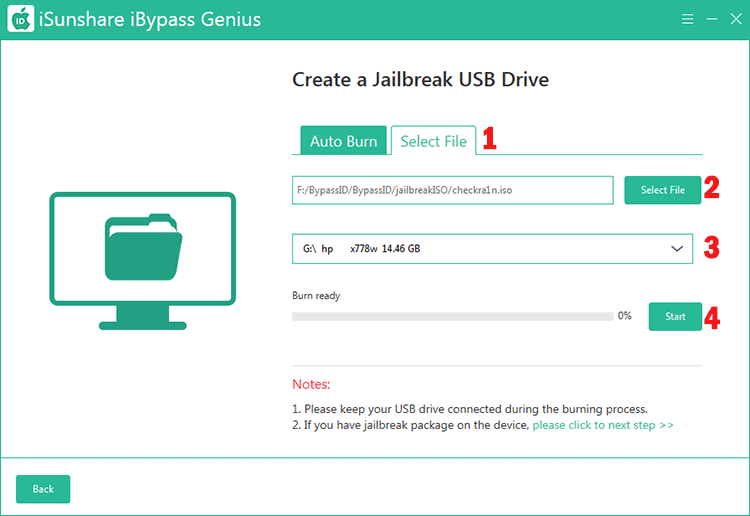
Tips: If there is a firmware file on your Windows PC, you can switch to the Select File tab. Then input the firmware file and select the USB drive. At last, hit Start to make a jailbreak disk.
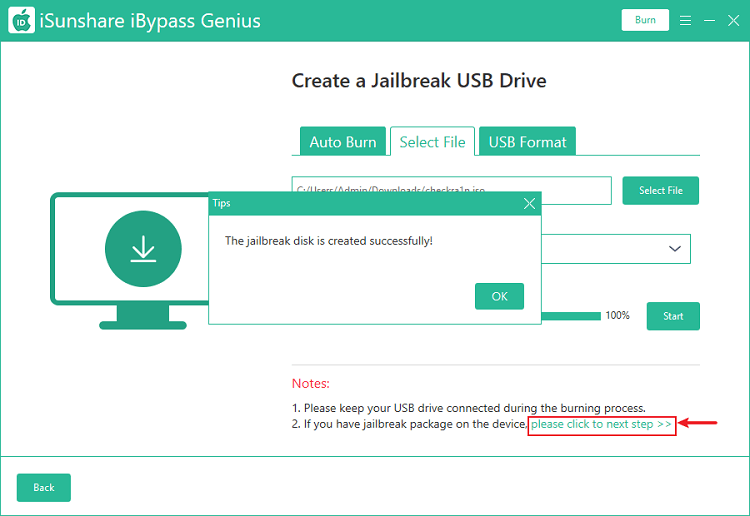
After successfully creating the jailbreak drive, you can click Please click to the next step option and follow the detailed guide to jailbreak your iDevice.
Certainly, you can jailbreak your iOS device by referring to this tutorial.
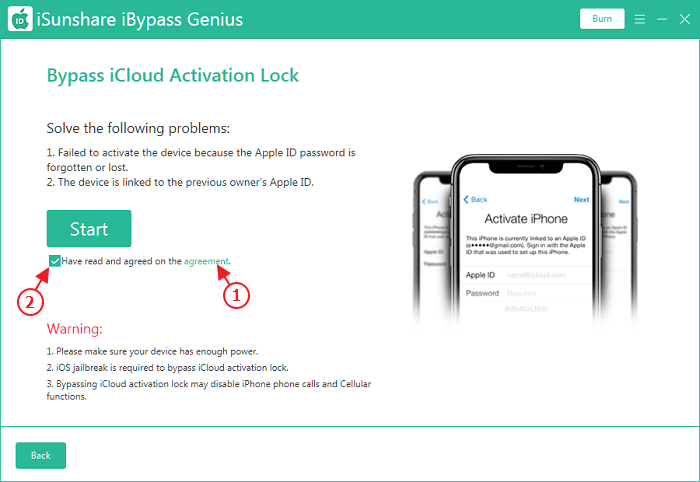
Step 2: Bypass iCloud Activation Lock.
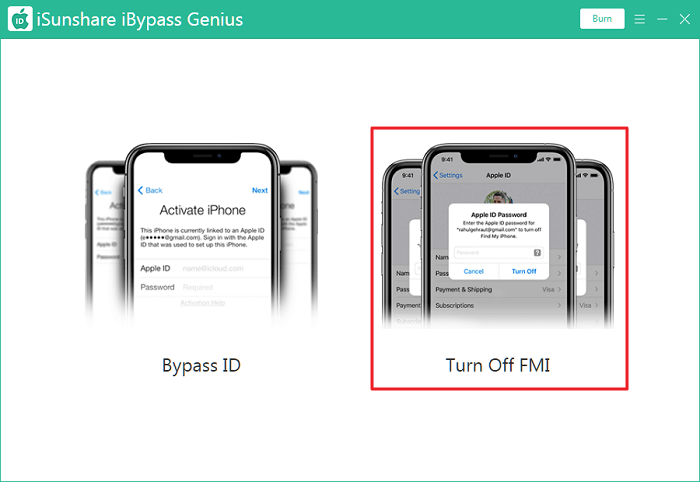
Connect your iPhone/iPad/iPod touch to the computer. Then launch the tool and select Bypass ID.
If a Trust or Don't Trust prompt is shown on your iOS device, you need to tap Trust so that your device can be identified.

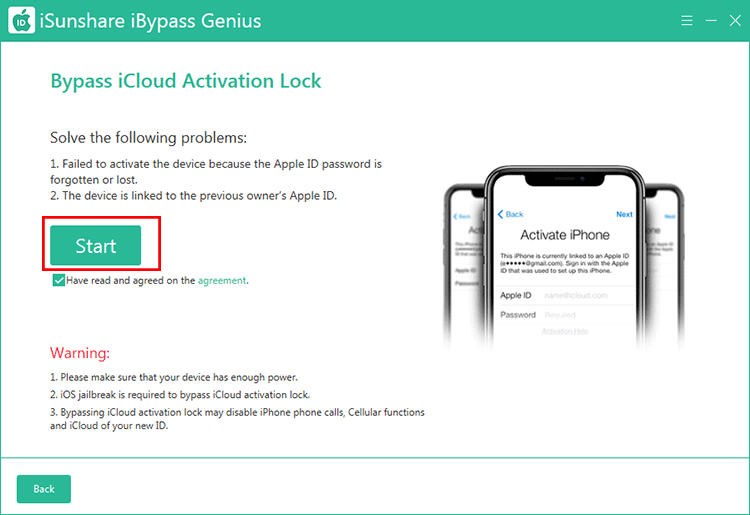
Click agreement and carefully read the items. If you agree on them, you can check Have read and agreed on the agreement so that you can use the bypass iCloud lock function.
Click Start to begin bypassing the iCloud activation lock.
Wait for the bypassing process, which would take some time to complete.
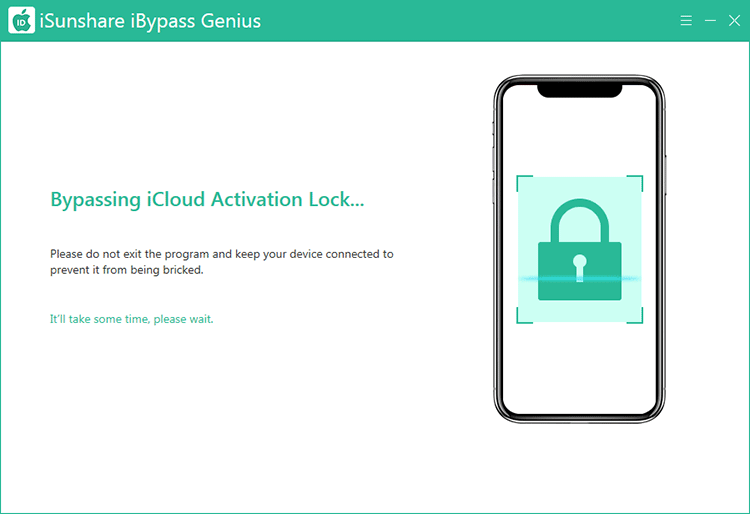
Once the activation lock is removed from your device, you can see the interface as follows.
Part 2: Turn off FMI without Password
Preps: Disable the internet connection on your iDevice and keep your computer network connected. Besides, backing up your iOS device because your data and settings will be removed during the turning off process.
Step 1: Jailbreak your iOS device by using the Burn function of iBypass Genius.
Step 2: Ensure that your device is connected to your computer. Then Launch iBypass Genius and choose Turn off FMI on the interface. To allow iBypass Genius to detect your iPhone/iPad/iPod touch, you might need to unlock your device and tap Trust on the [Trust or Don't Trust the computer] prompt.
Step 3: Click agreement and patiently read its content. If you agree on what the agreement says, you can check Have read and agreed on the agreement and hit Start.
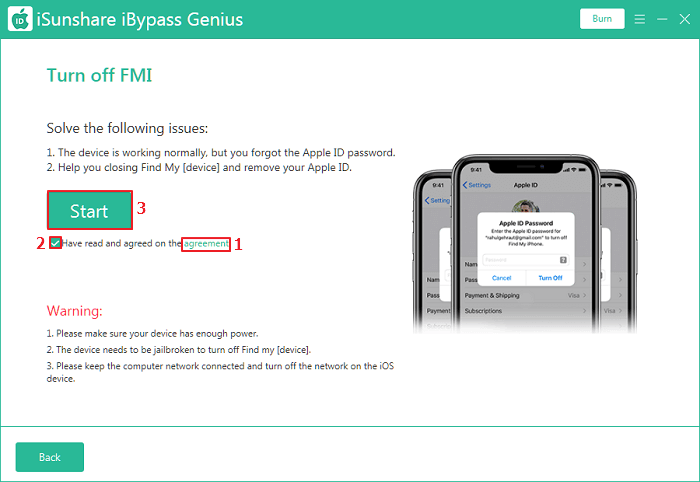
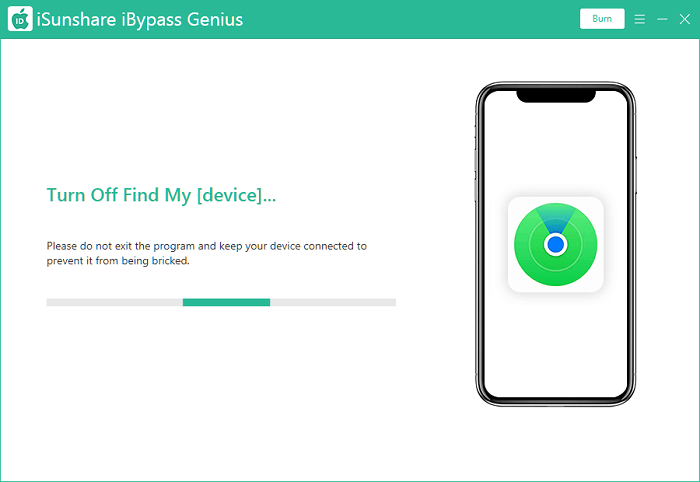
Instantly, iBypass Genius will begin turning off Find My for your device.
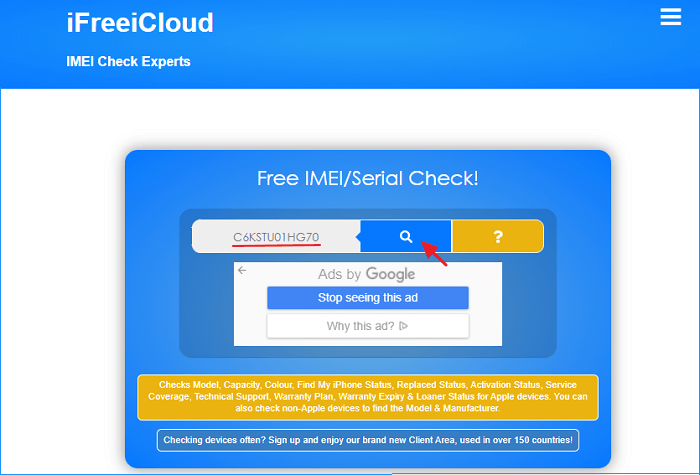
Step 4: To check whether the FMI function is successfully turned off on your iPhone/iPad/iPod touch, you can click Enabled to access a safe website to query the FMI status of your device.
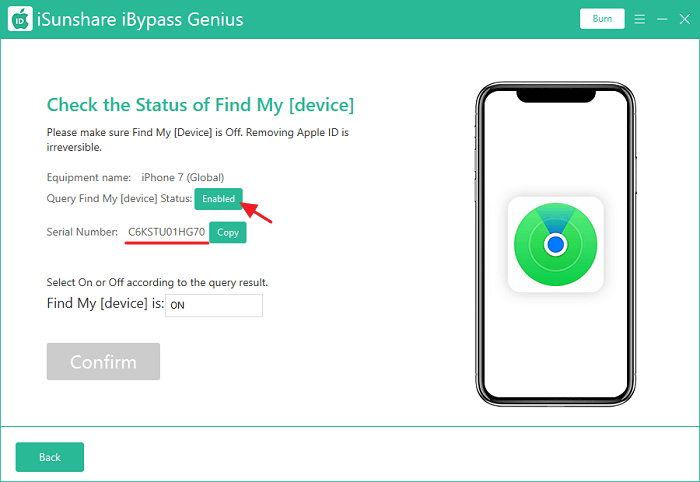
Just click Copy to copy the serial number(see the above screenshot) and paste it to the shown website for query. You will get the status soon.
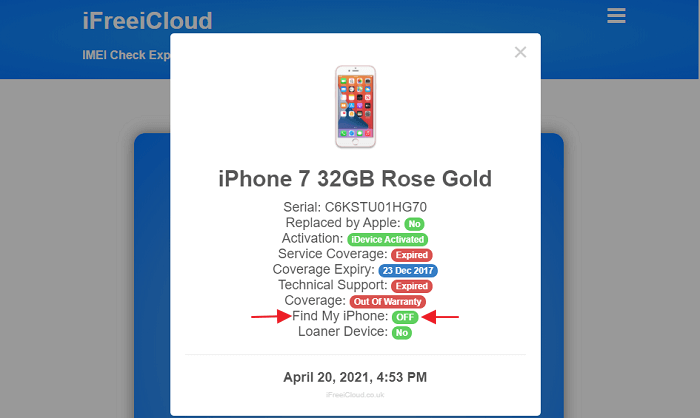
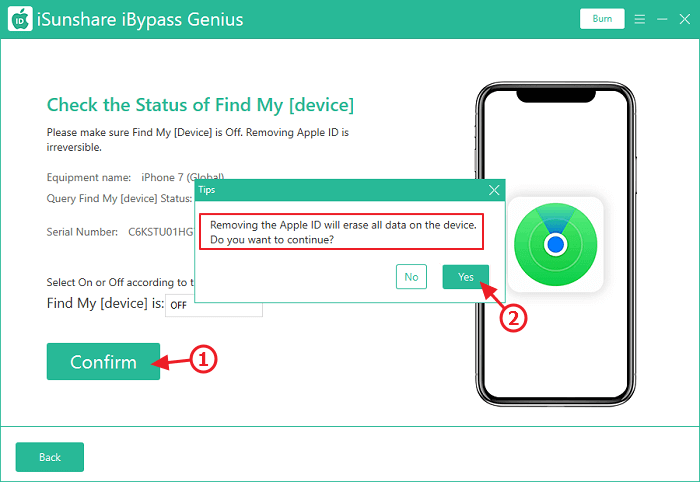
Step 5: If the FMI status is disabled on your device, you can choose OFF in the bar of Find My [device].
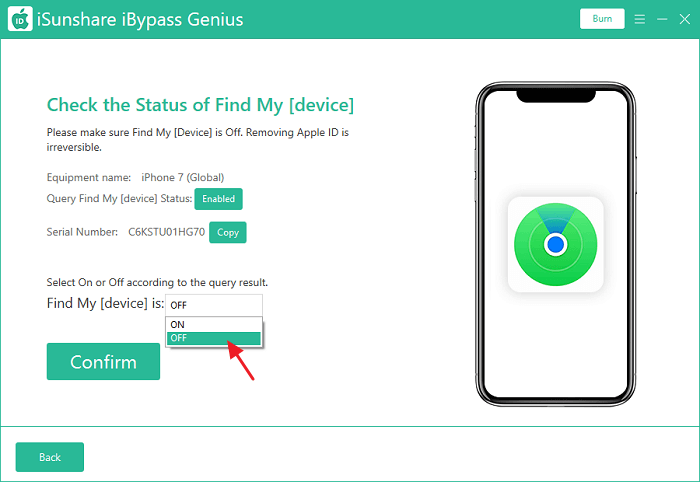
Step 6: Then hit Confirm to remove the Apple ID from your device.
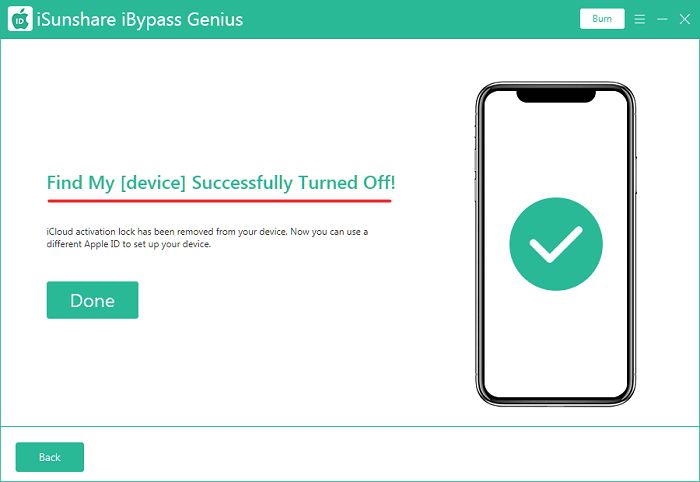
Step 7: After a while, the FMI function will be disabled on your device. Now, you can set up your iOS device as new.


![Unlock Tool 2026.05.29.0 Released [Latest Version]](https://blogger.googleusercontent.com/img/b/R29vZ2xl/AVvXsEiPClAyNDbiD2VQNTddAswgwIjQVzEAuANueInSeqhlglaeGBbFp6LHrUJyY8LsbUjal4A1ncRQ2ts9b0UeUpgMyNcsUkNqe27Pw5AUKsnYjjdsnh-QX8N4Ajl5kcsRhC-qZTJX5G1hmQiWByCkeQEagEbFUfcd-z1vWlHa_9hvhOfBfF_nwNX4feJ5b8as/w100/341081.jpg)
![SamsTool Online v1.33 Free Download [New Tool]](https://blogger.googleusercontent.com/img/a/AVvXsEiC6k7XNh79tkDETxiKaLV0L8CfFc8ex1uqM4V1EAQb1RHPanEqbmyoXBAh1PsVQKh_E3Uonx8xmOx0cq7MSxhur2GduRLwngcGEXrcLjwsyAR7drHQ1NbdXSryLB8oNG7hkMiZ28k1xfqT4-_GbhxSYR7S2RYVf3_rbDDqz_Dv3RDd5f8KQ5I6TVTl7h60=w100)


iSunshare iPhone Passcode Genius 4.1.1 Free Download)
0 Comments
Do Not Send SPAM Link !!!!