

For more updates and latest tools, subscribe to our Telegram channel.
Join Telegram ChannelHow to repair IMEI on Redmi 13C (Gale) when the bootloader is locked.
If you have a Redmi 13c (gale) phone with a locked bootloader and a damaged IMEI, you might be facing issues with network connectivity and device identification. Fortunately, there is a way to repair your original IMEI by using a hardware method and a software tool called DFT Pro. This method requires an ENG ROM, which I will provide you at the end of this article.

What You Need
Before you start, make sure you have the following items ready:
- A Redmi 13c (gale) phone with a locked bootloader and a damaged IMEI
- A PC or laptop with Windows OS and USB drivers installed
- A USB cable to connect your phone to your PC
- A soldering iron and a pair of tweezers
- A Mi Unlock tool to unlock the bootloader (optional)
- A DFT Pro tool to repair the IMEI
- An ENG ROM for Redmi 13c (gale)
Step 1: Flash the ENG ROM
The first step is to flash the ENG ROM on your phone. This ROM is a special firmware that allows you to access some advanced features and settings on your device. You can download the ENG ROM from Here.
To flash the ENG ROM, you need to follow these steps:
- Connect your phone to your PC with a USB cable and enable USB debugging mode on your phone. You can do this by going to Settings > About Phone > MIUI Version and tapping on it seven times. Then, go back to Settings > Additional Settings > Developer Options and enable USB Debugging.
- Extract the ENG ROM zip file to a folder on your PC and run the flash_all.bat file. This will start the flashing process and erase all your data on your phone. Wait until the process is completed and your phone reboots.
- If you encounter any errors or warnings during the flashing process, you might need to unlock the bootloader first. You can do this by using the Mi Unlock tool. Follow the instructions on the tool to unlock the bootloader and then flash the ENG ROM again.
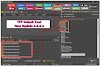
Step 2: Move the Red Resistance to the Green
The next step is to modify the hardware of your phone by moving a small resistor on the motherboard. This resistor is responsible for the IMEI verification and by moving it, you can bypass the verification and repair the IMEI.
To move the resistor, you need to follow these steps:
- Turn off your phone and remove the back cover and the battery. You might need to use a pry tool or a heat gun to do this.
- Locate the resistor on the motherboard. You can see it in the picture below:

- Use a soldering iron and a pair of tweezers to carefully remove the resistor from its original position and place it on the green pad next to it.
- Make sure the resistor is firmly attached to the green pad and there is no short circuit or damage to the motherboard.
- Reassemble your phone and turn it on.
Step 3: Wipe NV
The third step is to wipe the NV data on your phone. NV stands for Non-Volatile and it is a memory that stores some important information such as IMEI, WiFi MAC address, Bluetooth address, etc. By wiping the NV data, you can erase the old IMEI and prepare your phone for the new IMEI.
To wipe the NV data, you need to follow these steps:
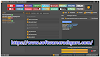
- Connect your phone to your PC with a USB cable and launch the DFT Pro tool. You can download the DFT Pro tool.
- On the DFT Pro tool, select your phone model and click on the Start button. This will detect your phone and show some information on the screen.
- Click on the Wipe NV button and wait until the process is completed. Your phone will reboot automatically.
Step 4: Repair IMEI in Meta Mode
The final step is to repair the IMEI on your phone in Meta Mode. Meta Mode is a special mode that allows you to communicate with your phone's modem and change some parameters such as IMEI, network bands, etc. By using the DFT Pro tool, you can enter Meta Mode and write a new IMEI on your phone.
To repair the IMEI in Meta Mode, you need to follow these steps:
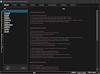
- Connect your phone to your PC with a USB cable and launch the DFT Pro tool.
- On the DFT Pro tool, select your phone model and click on the Start button.
- Click on the Meta Mode button and wait until your phone enters Meta Mode. You will see a yellow screen on your phone with some text.
- Enter the new IMEI that you want to write on your phone in the IMEI box on the DFT Pro tool. You can use any valid IMEI that is not blacklisted or reported.
- Click on the Write IMEI button and wait until the process is completed. Your phone will reboot automatically.
Congratulations!
You have successfully repaired the IMEI on your Redmi 13c (gale) with a locked bootloader. You can now enjoy the full functionality of your phone and connect to any network without any issues. You can also check the IMEI status by dialing *#06# on your phone or by using an online IMEI checker.
I hope this article was helpful and informative. If you have any questions or feedback, please leave a comment below. Thank you for reading! 😊

![Unlock Tool 2026.04.12.0 Released [Latest Version]](https://blogger.googleusercontent.com/img/a/AVvXsEjgyTLRSeYkzBghFaC8DYSCU4GpUixJSJSSWSxPDKFZpUSt8kcBJnx9dcNBaimpCY-jRYaIy54hEYj3BkPMjJgKcKdKREEOrL1bbkpOe5GvCR9ic3-1t6yEoUc_EzsYeztMhXSPOH-A67UwAqqm4-39Tjlng5k0K5hxiPRmdnmoEtZ1qRvKv4O8Rxmxw4VS=w100)


 with Bootloader Locked)
0 Comments
Do Not Send SPAM Link !!!!