

iCloud Unlock – Bypass Activation Lock With Checkra1n [FREE]
Finally, you can remove the icloud activation lock with the checkra1n icloud bypass powered by checkm8 bootrom exploit for free, follow below to remove activation lock to icloud unlock device.

Hey guys, this is going to be a remarkable piece of content for iPhone, iPad or other Apple users and especially those who buy or have bought a used iPhone or iPad from different online or offline stores. Because most of these phones are iCloud locked and iCloud activation lock is a big problem, let me correct myself, iCloud lock WAS a big problem. Because it was impossible to bypass activation lock for iCloud on your device until checkra1n iCloud bypass came out. I tried and things worked perfectly fine except the AppStore, fixing that issue is also mentioned below, moreover, it’s up to you if you want to try this out or not on your iCloud locked device. I am going to tell you about what iCloud is? What is iCloud activation lock, how you can iCloud unlock iPhone, iPad or any other Apple device from iCloud?
What Is iCloud Activation Lock
Apple loves this thing because once your device is locked with iCloud lock, it becomes unusable. Apple wants you to buy a new device from them instead of unlocking iPhone from iCloud.
No worries, in this detailed guide, I am sharing with you a way to unlock iCloud, before starting, let me tell you that if someone has said to you that iCloud lock is a permanent thing, it was, but not anymore because of latest checkra1n iCloud bypass utility. A big thanks to checkm8 and checkra1n team.
Supported Devices For iCloud Unlock Checkra1n Process
- iPhone 5s
- iPhone 6 and plus
- iPhone 7 and plus
- iPhone X
Supported iOS Versions For iCloud Unlock
- iOS 12.3 to the current latest iOS version.
Tools Needed For Remove iCloud Lock
- iCloud Locked Device
- Checkra1n Jailbreak Utility
- Mac Computer
- Patience
Important Note They are so many people offering iCloud unlock services with false promises; they just get your money and never unlock your iPad or iPhone. Even there are free software offer by people to remove activation lock, do not even think to try out those iCloud activation lock services.
CheckRa1n jailbreak Installation Guide –
With Computer / PC
Now you can easily download, CheckRa1n jailbreak Tool through using the above button
Step 1:
Download the CheckRa1n Jailbreak for iOS 13 – iOS 13.1 – iOS 13.2 Tool onto your computer.
Step 2:
Open dmg file and click checkra1n button

Step 3:

Connect your device to your computer using a USB cable. And enter DFU Mode
(DFU Mode – Press and hold the Power button and Home button together (10 S)
Release the Power button BUT KEEP HOLDING THE Home button)
Step 4:
Press Start Button
Step 5:

Wait for a few seconds…

Open CheckRa1n app on your home screen and hit install Cydia
Enjoy it.
Advantages of Checkra1n Jailbreak
- Cannot be patched by any iOS update
- Once jailbroken it will last until user unjailbreak it
- Tap on unc0ver Jailbreak
- Can use for any iOS version (stated by developers)
- Latest coming versions also will be compatible with the jailbreak
- Will be a tethered jailbreak
Checkra1n Jailbreak Device Compatibility
We assumed that the checkra1n jailbreak will run on all devices that support both checkm8 (A7 – A11) and iOS 13 (A8+2GB RAM – A11) which include:
- The iPhone 6S to the iPhone X (included)
- iPhone 6 & iPhone 6 Plus, iPhone SE, iPhone 7 & iPhone 7 Plus, iPhone 8 & iPhone 8 Plus, iPhone X
- All iPad, iPad Pro, and iPad Air models excluding:
- 2018 iPad Pro models
- iPad Mini 5
- iPad Air 3 (2019)
The iPod Touch 7th generation – yeah, iPod Touches still exist and the jailbreak has been demonstrated running on one of them.
nitoTV’s creator seems to be working on an Apple TV variant of checkra1n, but it’s unknown whether that’ll be released next week
Unsupported Devices for checkra1n
iPhone 11 Pro, iPhone 11, iPhone 11 Pro Max, iPhone XR, iPhone XS Max, iPhone XS, iPhone XS Max.
How to install checkra1n Jailbreak on Windows and Mac Pc
Steps by Step guide to prepare your Mac / Windows Pc to checkra1n Jailbreak tool
The following guide is a complete walkthrough for updating or installing a fresh version of macOS Mojave.

Table of Contents
- Step 1: Download macOS Mojave
- Step 2: Create a Bootable USB with BalenaEtcher
- Step 3: Recommended BIOS Settings
- Step 4: Install macOS Mojave
- Step 5: Install Checkra1n jailbreak On Mojave
- Troubleshooting and Optimizations
Before You Begin
- Get our latest BalenaEtcher tool from the downloads section.
- Purchase a 16GB or larger USB drive.
- Do a full backup of your system. We strongly recommend performing a full backup of your existing system using Carbon Copy Cloner. By doing this, you can always go back to your working installation.
- Download macOS Mojave from the downloads section.
Download Section –
BalendaEtcher is a tool that creates a bootable installer out of your downloaded version of macOS. In order to start fresh, you’ll need access to a functional computer running OS X Lion 10.7.5 or later.
STEP 1: Download macOS Mojave
The full operating system is a free download for anyone who has purchased Mac OS X Snow Leopard, Lion, or Mountain Lion or has a Mac preloaded with OS X Mavericks, Yosemite, El Capitan, macOS Sierra, or macOS High Sierra.
The full operating system is a free download for anyone who has purchased Mac OS X Snow Leopard, Lion, or Mountain Lion or has a Mac preloaded with OS X Mavericks, Yosemite, El Capitan, macOS Sierra, or macOS High Sierra.
Download the Application from the Mac App Store using your Apple ID on any of these specific Macs:
- MacBook (Early 2015 or newer)
- MacBook Air (Mid 2012 or newer)
- MacBook Pro (Mid 2012 or newer)
- Mac mini (Late 2012 or newer)
- iMac (Late 2012 or newer)
- iMac Pro (2017)
- Mac Pro (Late 2013, plus mid-2010 and mid-2012 models with recommended Metal-capable GPU)
Method 1 – Download Mojave From Apple Store
- Open Mac App Store
- Log in with your Apple ID
- Download macOS Mojave
Method 1 – Download Mojave directly.
Use one link from below button
Google drive
Yandex
** Installation File Contents:
- Config Files:
Config.plist files for Intel Laptop and AMD Ryzen, FX and A series. Usage information is shared below. - SSDT Files SSDT files that
may be useful after installation. The descriptions of these SSDTs are described in the folder “READ ME”. - Applications :
Many applications that will be useful after installation. The usage details of all applications were shared in the folder contents.
The Application Install macOS Mojave will appear in /Applications.

STEP 2: Create a Bootable USB Drive with balenaEtcher
Take a deep breath and take your time- this is pretty simple, but it’s easy to miss things if you rush. Follow each step to the letter.
Take a deep breath and take your time- this is pretty simple, but it’s easy to miss things if you rush. Follow each step to the letter.
To print the Windows USB on Mac OS:
Insert the USB drive
– Format USB in MS-DOS (FAT) and Master Boot Record (MBR) in Disk Utility.
– Open the iso file, select all and copy it into USB. Your Windows USB is ready.
– Open the iso file, select all and copy it into USB. Your Windows USB is ready.

OR
Create a Bootable USB Drive with UniBeast
Open /Applications/Utilities/Disk Utility
Highlight the USB drive in the left column (Note: in the Mojave version of Disk Utility, you must first select View / Show All Devices before you can see the USB drive there)

- Click Erase button
- For Name: type USB (You can rename it later)
- For Format: choose Mac OS Extended (Journaled)

7. Click Erase then Done

- Download and run UniBeast
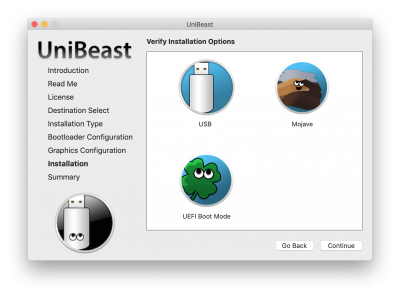
- Click Continue, Continue, Continue, Continue, Agree
- At Destination Select, choose USB and click Continue

- At Select, OS Installation screen choose Mojave and click Continue
- At Bootloader Options screen choose UEFI Boot Mode or Legacy Boot Mode. UEFI Boot Mode is recommended for 7/8/9/100/200/300 Series CustoMac desktops and all UEFI capable systems. Legacy Boot Mode is recommended for 5/6 Series CustoMac desktops and all BIOS-based systems.

- (Optional) At Graphics Configuration screen choose the appropriate graphics option for your system and click Continue.
- Verify installation options, then click Continue, enter the password and click Install
UniBeast will now create the bootable USB drive. The process will only take about 10 minutes, depending on the system and drive speed. Do not unplug or stop during this time.

15. Drag MultiBeast to your completed USB drive.
Clover Note: UniBeast delivers basic bootloader support based on our testing on recommended CustoMac systems.
For further bootloader customization, download and run the official Clover package. Advanced users may also compile Clover by downloading the full source.
STEP 3: Recommended BIOS Settings
If you’re installing on a recommended CustoMac desktop with AMI UEFI BIOS, the options are simple. For other systems make sure to set your BIOS to Optimized Defaults, and your hard drive to AHCI mode.
- To access BIOS/UEFI Setup, press and hold Delete on a USB Keyboard while the system is booting up(F2 -on some device)
- Load Optimized Defaults
- If your CPU supports VT-d, disable it
- If your system has CFG-Lock, disable it
- If your system has Secure Boot Mode, disable it
- Set OS Type to Other OS
- If your system has IO Serial Port, disable it
- Set XHCI Handoff to Enabled
- If you have a 6 series or x58 system with AWARD BIOS, disable USB 3.0
- Save and exit.
BIOS Settings (Intel)
- Before you start, reset your BIOS settings to the default settings (Load Default Settings).
- SATA: Set to AHCI
- VT-D: Set to Disable
- EHCI Hand-off / xHCI Hand-off: Set to Enable.
- xHCI Mode: Smart Auto
- Secureboot: Set to Disable (Other OS)
- CFG-Lock = Disable
- Boot Option Priorities: Set to UEFI USB. Or UEFI and Legacy.
BIOS Settings (AMD Ryzen)
- Before you start, reset your BIOS settings to the default settings (Load Default Settings).
- OC Tweaker -> Load XMP Setting: XMP 2.0 Profile 1
- Advanced \ CPU Configuration -> SWM Mode = Enabled
- Advanced \ North Bridge Configuration -> IOMMU: Disabled
- Advanced \ South Bridge Configuration -> Deep Sleep : Disabled
- Advanced \ Storage Configuration -> Sata Mode: AHCI Mode
- Advanced \ AMD CBS \ FCH Common Options \ USB Configuration Options -> XCHCI controller enable: Enabled
- Advanced \ AMD CBS / NBIO Common Options \ NB Configuration -> IOMMU: Disabled
- Security -> Secure Boot: Disabled
- Boot -> Fast Boot: Disabled
** Not all systems have the same BIOS settings. Apply whatever settings you have.

STEP 4: Install macOS Mojave
You’re almost done! All you need to do is boot from the USB drive and install it! For best results, insert the USB in a USB 2.0 port.
STEP 4: Install macOS Mojave
You’re almost done! All you need to do is boot from the USB drive and install it! For best results, insert the USB in a USB 2.0 port.
- Turn on the computer
- Press the hotkey to choose boot device (F12 for Gigabyte motherboards, F8 for ASUS motherboards, F11 for ASrock motherboards)
- Choose USB

- At Clover boot screen, choose Boot OS X Install from Install macOS Mojave
- When you arrive at the Installer, choose a language.
If you have issues reaching the installer, you can use the spacebar on the boot screen to enter alternate boot modes such as verbose and safe mode. For more instructions on entering boot, flags see Clover Basics and Switching Advice.
6. For a new installation of macOS, you MUST erase and format the destination drive according to the following steps before continuing.
a. In the top menu bar choose Utilities and open Disk Utilityb. Highlight your target drive for the Mojave installation in the left column.c. Click Erase buttond. For Name: type Mojave (You can rename it later)e. For Format: choose Mac OS Extended (Journaled)f. Click Eraseg. Close Disk Utility
a. In the top menu bar choose Utilities and open Disk Utilityb. Highlight your target drive for the Mojave installation in the left column.c. Click Erase buttond. For Name: type Mojave (You can rename it later)e. For Format: choose Mac OS Extended (Journaled)f. Click Eraseg. Close Disk Utility
- When the installer asks you where to install, choose Mojave
- Upon completion, the system will automatically restart.
- Press the hotkey to choose boot device (F12 for Gigabyte motherboards, F8 for ASUS motherboards, F11 for ASrock motherboards)
- Choose USB
- At the Boot Screen, choose Mojave
- Complete macOS installation. The system will automatically reboot.

STEP 5: Post Installation with MultiBeast
MultiBeast is an all-in-one post-installation tool designed to enable boot from hard drive, and install support for Audio, Network, and Graphics. The installation is complete, but the drive isn’t bootable yet. Boot from the USB again, this time choosing Mojave.
MultiBeast is an all-in-one post-installation tool designed to enable boot from hard drive, and install support for Audio, Network, and Graphics. The installation is complete, but the drive isn’t bootable yet. Boot from the USB again, this time choosing Mojave.
- Press the hotkey to choose boot device (F12 for Gigabyte motherboards, F8 for ASUS motherboards, F11 for ASrock motherboards)
- Choose USB
- At the Boot Screen, choose your new Mojave installation.
- Complete macOS setup
- Open and run MultiBeast

6. If this is a fresh installation, click QuickStart. UEFI Boot Mode is recommended for 7/8/9/100/200/300 Series CustoMac desktops and all UEFI capable systems. Legacy Boot Mode is recommended for 5/6 Series CustoMac desktops and all BIOS-based systems.

- Choose the appropriate Drivers options for your system.
- Click Customize for further options

- Click Print or Save to back up your configuration
- Click Build then Install

If using a GeForce GTX 1050, 1050 Ti, 1060, 1070, 1070 Ti, 1080, 1080 Ti, TITAN Pascal, and TITAN Xp ‘Pascal’ graphics card or NVIDIA GeForce GTX 750, 750 Ti, 950, 960, 970, 980, 980 Ti, and TITAN X ‘Maxwell’ graphics card, macOS Mojave graphics drivers are not natively supported. Alternate NVIDIA drivers are required.
Note: Alternate NVIDIA Graphics Drivers are not available yet- if you have a Maxwell or Pascal-based NVIDIA card, stay on High Sierra for now.
- (Optional) Download and install Alternate NVIDIA Graphics Drivers
- Reboot

Yay! You now have a fully updated bootable version of macOS Mojave on your CustoMac! And a super handy USB rescue drive. It’s easy to get frustrated, but don’t give up! If you get stuck, there are many users with similar hardware in the tonymacx86 Forum to provide support.
Yay! You now have a fully updated bootable version of macOS Mojave on your CustoMac! And a super handy USB rescue drive. It’s easy to get frustrated, but don’t give up! If you get stuck, there are many users with similar hardware in the tonymacx86 Forum to provide support.
Thanks to all of the hard-working developers, hackers, and testers all over the world without whom this guide would never have been possible.
Tested Systems;
- Asus Z170 Deluxe, i7 6700k, RX 580
- Ryzen 3 1200, Asrock AB350, GTX 680
- HP Pavillion, q8300, GT 220, GT 630
How to Unlock an iCloud-Locked iPhone – Checkra1n jailbreak iCloud Bypass Guide

Did you lose your iCloud password?
Activation Lock that is designed to prevent anyone else from using an iPhone, iPad or Watch if it’s ever lost or stolen. Activation Lock is enabled automatically when you turn on Find My iPhone on a device.
iOS Developers “ CrazyMind90 “ and “ aJBboCydia “ are released iCloudBypassCA tool for bypass iCloud activation.
Before you started –
- Download the latest Checkra1n update.
- You have to jailbreak your Device with the Checkra1n jailbreak tool.
- Checkra1n jailbreak guide.
Supported Devices For iCloud Unlock Checkra1n Process iCloudBypassCA Tool
- iPhone 5s
- iPhone 6 and plus
- iPhone 7 and plus
- iPhone X
Supported iOS Versions For iCloud Unlock
- iOS 12.3 to the current latest iOS version.
iCloudBypassCA iCloud Bypass Guide
- Step 01 – Connect your Device to Mac.
- Step 02 – Jailbreak your Device with Checkra1n Tool.
- Step 03 – Download the iCloudBypassCA tool.
- Step 04 – Install iCloudBypassCA tool.
- Step 05 – Open the iCloudBypassCA app.
- Step 06 – Open terminal window.
- Step 07 – You should see two commands on iCloudBypassCA interface

- Step 08 – Copy and paste these two commands and paste in on terminal Window
- Step 09 – Tap Move iCloud to trash and wait for the process to complete
- Step 10 – Wait for the Done message

- Step 11 – Now your Device will be restart
Done. Congratulations and your Device successfully unlocked
Jailbreak Alternatives
Jailbreak is the process of removing Apple software restrictions for iOS devices. Usually, iOS users can install apps from the Apple App Store only.
Jailbreak is the only way to install iOS system tweaks, themes, customization apps and many kinds of Apple dissentient apps.
At this time, several Jailbreak tools released for iOS 13, iOS 12 to iOS 12.2 Jailbreak & iOS 12.4 Jailbreak. It should use an alternative jailbreak solutions to install jailbreak apps on other iOS 12.3 to iOS 12.3.2, iOS 12.4.1, iOS 12.4.2, iOS 13, iOS 13.1, iOS 13.1.1, iOS 13.1.2, iOS 13.1.3 & iOS 13.2 beta versions.

![Unlock Tool 2026.05.29.0 Released [Latest Version]](https://blogger.googleusercontent.com/img/b/R29vZ2xl/AVvXsEiPClAyNDbiD2VQNTddAswgwIjQVzEAuANueInSeqhlglaeGBbFp6LHrUJyY8LsbUjal4A1ncRQ2ts9b0UeUpgMyNcsUkNqe27Pw5AUKsnYjjdsnh-QX8N4Ajl5kcsRhC-qZTJX5G1hmQiWByCkeQEagEbFUfcd-z1vWlHa_9hvhOfBfF_nwNX4feJ5b8as/w100/341081.jpg)

![SamsTool Online v1.33 Free Download [New Tool]](https://blogger.googleusercontent.com/img/a/AVvXsEiC6k7XNh79tkDETxiKaLV0L8CfFc8ex1uqM4V1EAQb1RHPanEqbmyoXBAh1PsVQKh_E3Uonx8xmOx0cq7MSxhur2GduRLwngcGEXrcLjwsyAR7drHQ1NbdXSryLB8oNG7hkMiZ28k1xfqT4-_GbhxSYR7S2RYVf3_rbDDqz_Dv3RDd5f8KQ5I6TVTl7h60=w100)


0 Comments
Do Not Send SPAM Link !!!!