

For more updates and latest tools, subscribe to our Telegram channel.
Join Telegram ChannelEpson TX800FW (EAI) resetter tool | Adjustment Program
Epson TX800FW (EAI) resetter tool & Free Download Epson Adjustment Program. Today we will present your Epson TX800FW (EAI) printer with new latest resetter software. Resetting Epson TX800FW (EAI) without money. Epson TX800FW (EAI) printer is a multifunctional ultra-high-performance printer. Epson TX800FW (EAI) resetter software free download for Windows 7, 8, 8.1 10, 11. This works with all versions of Windows 32bit and 64bit.
The main function of the program
- Solve the symptom of full ink absorber or flashing lights alternately
- Solve the problem of ink not flowing fully.
- Solving the problem of printing and distorted colors
- Power Cleaning function
- Check for abnormalities of the printer.
- and other functions Much more needed…
Epson Service Required
The Epson TX800FW (EAI) Software for Resetter Adjustment is a program that can be used to reset your printer’s waste ink pad counter. Now your printer displays the “Service Required” message, you can use this software to reset the factory condition printer.
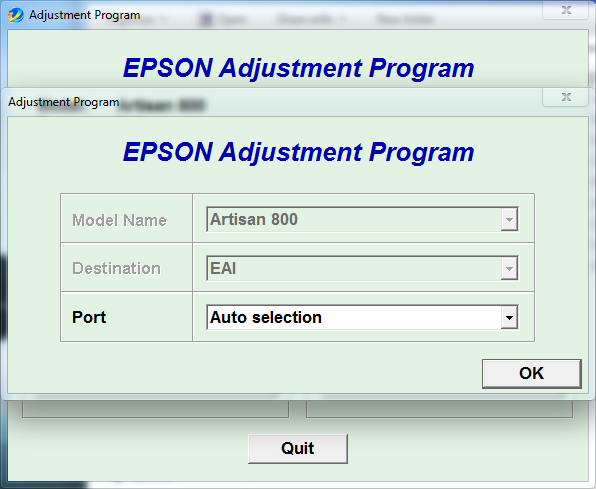
How to Reset Epson TX800FW (EAI) Printer?
1. Download Reset Epson L1800 on the link that I have provided above.
2. Open the L1800 reset program by clicking " Adjprog.exe "if it can't be opened or there is an error you have to do some repairs, how to see the video tutorial above.
3. If you can run the L1800 reset program, then click " Particular adjustment mode" then select " Waste ink pad counter ".
4. Then on the words " Check & Initialization " check the " Main pad counter " and " Platen pad counter " then click " Check " and click " Initialize " then click " Finish "
Why We Need Epson TX800FW (EAI) Resetter?
Epson TX800FW (EAI) was developed to print a large number of pages, as previously mentioned. As a result, Epson equipped the Epson TX800FW (EAI) printer with a large number of sponge pads. “Waste Ink Pads” is what these sponge pads are called. The waste ink produced by the printer’s cleaning process is absorbed by these waste ink pads when the printer cleans its print head after each printing session. When these waste ink pads become full and begin to overflow, the Epson TX800FW (EAI) displays the errors mentioned above and stops functioning.
Resetting Epson TX800FW (EAI)
The Epson TX800FW (EAI) is a highly reliable printer from Epson, however, it starts to show problems after a lot of use, giving users the idea that their printer needs to be repaired. The problem message is ‘Service required,’ and the two red LED lights and one green power button light blink in unison. They are likewise unable to print new pages. If you’re having trouble with this issue, don’t worry; we’ll go over how to fix it right here.
Epson Adjustment Program
The issue is known as the “Waste Ink Pad Counter Overflow”. Epson has released software named the Epson TX800FW (EAI) resetter tool to fix this problem. The Epson adjustment program download. Epson resetter software free download. On this page, you will find a link to download the Epson TX800FW (EAI) resetter program for free, as well as detailed instructions on how to use the Epson TX800FW (EAI) adjustment program to reset your Epson TX800FW (EAI). The issues listed below can be resolved:
- A printer’s ink pad is at the end of its service life (Waste ink pad counter overflow).
- Epson Service Required OR Service Life Expired Soon
- Red light blinking
- Inkpad counter resetter
Download Link: MEGA
(Password: sbz)
README:
Compatibility: The tool runs perfectly on Windows XP, Windows Vista, Windows 7, Windows 8, Windows 8.1, and Windows 10 (32-bit and 64-bit).
Take a Backup: If you are willing to try the above tool, then please take a backup of your personal data from your Android Smartphone or Tablet. Flashing any Firmware or recovery may brick the device.
Credits: EPSON TX800FW (EAI) Resetter Tool is created and distributed by the developer. So, full credits go to the developer for sharing the tool for free.

![Unlock Tool 2026.04.12.0 Released [Latest Version]](https://blogger.googleusercontent.com/img/a/AVvXsEjgyTLRSeYkzBghFaC8DYSCU4GpUixJSJSSWSxPDKFZpUSt8kcBJnx9dcNBaimpCY-jRYaIy54hEYj3BkPMjJgKcKdKREEOrL1bbkpOe5GvCR9ic3-1t6yEoUc_EzsYeztMhXSPOH-A67UwAqqm4-39Tjlng5k0K5hxiPRmdnmoEtZ1qRvKv4O8Rxmxw4VS=w100)


0 Comments
Do Not Send SPAM Link !!!!