

For more updates and latest tools, subscribe to our Telegram channel.
Join Telegram ChannelHow to Fix IMEI Issues on Redmi Note 13 Pro: A Detailed Guide😊
The Redmi Note 13 Pro is a popular device, but sometimes it may face problems with its IMEI (International Mobile Equipment Identity). This can affect your phone’s network connectivity and performance. This article will show you how to restore the original IMEI on your Redmi Note 13 Pro in a few easy steps. Please follow these instructions carefully to avoid any errors or damage to your device.

Process👇
👉Activate Diag and Backup QCN File:
The first step is to activate the diagnostic (diag) mode on your device using the DFT (Device Firmware Tool) interface. This will allow you to access and modify the device’s firmware settings. Next, you need to back up the QCN (Qualcomm Calibration Network) file, which contains your device’s original IMEI and other network-related information. This will help you restore the IMEI later if needed. Root the Device:👇
The second step is to root your device, which means gaining full control over its system and features. You can do this either using the DFT interface or by downloading and flashing the compatible boot file for your device model. If you choose to use the boot file, you will need to flash it via Fast Boot mode, which is a special mode that allows you to install custom software on your device. You can follow the instructions provided with the boot file to do this correctly. Reset IMEI via DFT Interface:
The third step is to reset the IMEI on your device using the DFT interface. This will erase the current IMEI and prepare your device for the repair process. Address Recovery Mode Issue:
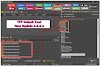
After resetting the IMEI, your device may get stuck in recovery mode, which is a mode that allows you to perform various maintenance tasks on your device. You may also see a red error message saying ‘nv data corrupted’, which means that your device’s network settings are corrupted. To fix this, you will need to disassemble your device and locate the resistance component on the motherboard. This is a small electronic part that controls the voltage and current flow in your device. You will need to change the resistance value according to the instructions provided for your device model. You can refer to the picture below to identify the resistance component and its location. Complete Resistance Modification:
Once you have changed the resistance value as per the instructions, you can reassemble your device and turn it on. Boot Without IMEI:
You will notice that your device now boots normally, but without the IMEI. This is normal at this stage, as you have not yet restored the original IMEI. Reactivate Diag, Write IMEI, and Restore QCN:👇
The final step is to reactivate the diag mode on your device using the DFT interface. Then, you need to write the first and second IMEI on your device using the DFT interface. You can find the IMEI numbers on the back of your device or on the original packaging. After writing the IMEI, you need to restore the QCN file that you backed up earlier. This will ensure that your device’s original IMEI and network settings are restored. Reboot the Device:
The last thing you need to do is to reboot your device to apply the changes. You can check your device’s IMEI by dialing *#06# on your phone app. You should see the same IMEI numbers that you wrote earlier. Conclusion: You have successfully restored the original IMEI on your Redmi Note 13 Pro. This should fix any IMEI-related issues and improve your device’s network connectivity and performance. Please note that this process is risky and may void your device’s warranty, so do it at your own discretion and responsibility.

![Unlock Tool 2026.04.12.0 Released [Latest Version]](https://blogger.googleusercontent.com/img/a/AVvXsEjgyTLRSeYkzBghFaC8DYSCU4GpUixJSJSSWSxPDKFZpUSt8kcBJnx9dcNBaimpCY-jRYaIy54hEYj3BkPMjJgKcKdKREEOrL1bbkpOe5GvCR9ic3-1t6yEoUc_EzsYeztMhXSPOH-A67UwAqqm4-39Tjlng5k0K5hxiPRmdnmoEtZ1qRvKv4O8Rxmxw4VS=w100)


)
0 Comments
Do Not Send SPAM Link !!!!